
Home › Forums › Everything about everything else › Impossible Tail Duct (With .STL)
- This topic has 41 replies, 5 voices, and was last updated 5 years, 6 months ago by
Frederoo.
-
AuthorPosts
-
31 July, 2018 at 14:01 #58551
Kevin_Erik
ModeratorHere’s a bit of a remix of the Impossible Tail Mechanism (ITM), combining a 5″ duct.
@Terje / @dkdarkness The Holder and Duct are completely new, just used your ITM for the proper scaling comparisons. Keep in mind that your “Servo Holder” and “Back Support” would still be required to use the Duct. (Both are shown in the images)
Latest work, shown below at 40 degrees Servo yaw, with RS2205-2300kv motor and 5″ prop included.

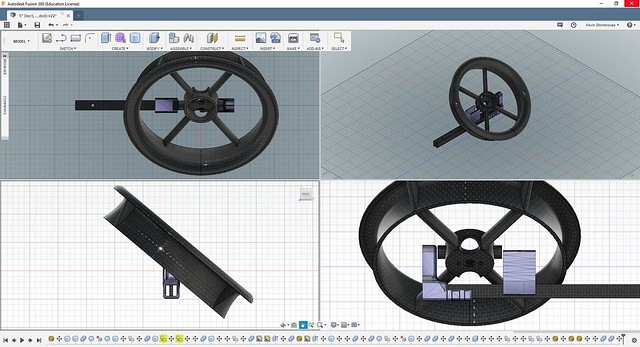
Download link: https://www.thingiverse.com/thing:3028330
@David @Litterbug This should work nicely for the Bicopter. Suggest printing this out using Nylon or Nylon / Kevlar as they’re very resilient to impact, while remaining relatively light. Carbon, ABS, and PLA do work but i have found that they are difficult to work with due to warping and layer seperation issues.
31 July, 2018 at 17:43 #58553ModeratorHaving 3Dhubs print one for me out of Nylon. Should see it in about a week.
31 July, 2018 at 19:02 #58555LitterBug
ParticipantArrrgggghhhh… Haven’t had my big printer working in months.
Must….
Fix….
Printer….
Really want to give these a “Tri”
Cheers!
LitterBug31 July, 2018 at 19:07 #58556ModeratorI’ve added a few things since i made those pictures.
Any Thoughts on the .STL?3 August, 2018 at 15:41 #58569ModeratorBeen tinkering with the Duct more and have added a secondary lip to draw in more air. (Similar to a Dyson fan) What do you think, would this work?
Please also note that i redid the Duct throat to allow better placement of the Propeller. (Larger sweet spot) he prior release overlooked the prop placement and thus the prop appears to sit a little bit too high.
3 August, 2018 at 18:37 #58574ParticipantLooks real good, but it would be nice to have all 4 motor holes, and slotted holes so motor wire orientation can be picked easier.
Note to self:
Must….Get….
Big….
Printer…..
Working……
<sigh>
3 August, 2018 at 19:35 #58575ModeratorCan you give an example of how you need the holes ?
Dimensions and hole sizes would help.I currently use the attached images to base the holes from.
So far 16mm M3 holes (3mm + 0.1mm for added wiggle room) has worked.Attachments:
3 August, 2018 at 19:57 #58578ModeratorDoes this work?
Slots are 16 to 19mm spacing @ 3.1mm width.
Also what about the extra Aero Lip, keep it or lose it?
Attachments:
3 August, 2018 at 21:52 #58580ParticipantThe slotting looks good on the holes. Would rather keep the existing two and add the 2 for that pattern rather than adding the other four. I’d also rather have mount holes below the motors than cooling holes which don’t do anything for my motors. Mine are flat on bottom with no vents.
If the aero lip adds material mass, I would prefer a simpler design. I’d rather have faster movement/reaction. It’s all a guess until we test though.
I don’t know when my big printer will be functional again. Basically rewiring from scratch and same for firmware. Switching from proprietary firmware/filament cartridges and crippled heat settings to Repetier. So it requiress a complete recalibration of every printer aspect. (really should have just gotten a different printer at this point)
3 August, 2018 at 23:05 #58582ModeratorCan you sketch out what you need so I can get the holes right the first time. Keep in mind that my proposed hole pattern (prior image) works for both the 16mm & 19mm requirements. For instance the Emax RS2205-2300kv (David’s motors) uses either 16 or 19 depending on its facing. The Emax LS2207 motor uses only 16mm holes regardless of its orientation.
That big cooling hole isn’t a cooling hole. It allows the motors C-clip to spin freely without coming into contact with the mount. I had this happen before and it chewed up the frame pretty good. Granted not all motors have C-clips but there are some older / cheeper ones that still do.
I have made a duct without the secondary Lip. (On website for DL) Unless your talking about the main Lip, which is easy to chop off. (“Might” save you 5-10 grams) Even with the Duct as is you’ll not see a lot of drag unless your flying 60kph or greater. The small size of our copters makes it more manageable till speed becomes excessive.
4 August, 2018 at 14:13 #58584ParticipantI’m currently using this version of the “Baby” impossible tilt motor holders that has 4 holes with a mini tri mount plate as a spacer. (I’m using real short x2204s motors) If the holes could be oriented like this and slotted like the Mini tri motor plates @david sells, that would be great.
LB
4 August, 2018 at 20:28 #58586ModeratorOk… I’ve something in mind that will work for your application.
You do realize that you only need two screws to mount the motor? the holes closest to the centerline of the mount would allowed you to do just that. Far as i know of the extra screws don’t really make it more secure but do add weight.5 August, 2018 at 01:21 #58587ModeratorHows this?
* Adjusted Screw holes.
* Removed center hole and added a depression in its place to accommodate motor c-clips.
* Made a simplified Duct without Primary or Secondary LipsThingiverse files updated: https://www.thingiverse.com/thing:3032817
5 August, 2018 at 04:08 #58592ParticipantYeah, That looks good. Nuts… Previously didn’t look close enough or think about where the motor wires pass through, so yeah, the four slotted holes lined up with the duct arms are the ones that will be needed, not the four I currently use. Wonder how it would turn out if I scaled it down in Simplify3D and tried printing it for some 2″ or 3″ motors/props on my smaller printer. Thinking about making a micro with 1104 or 1306 motors…
LB
5 August, 2018 at 04:40 #58593ModeratorYour best bet would be to contract it out.The bicopter only needs two and most prints cost between 10-100 dollars (each) depending on print method and material. The best part is if they screw up, they have to redo it.
Note: In my experience, Nylon is pretty much unbreakable under normal use. While ABS and PLA turn to shit if you look at them wrong. They’re only worth using to test a design as they don’t take a crash well.
-
AuthorPosts


- The forum ‘Everything about everything else’ is closed to new topics and replies.