
A few words before we start:
To get the best stability and flight performance from your KK-controller mount it using a vibration dampening material such as “gyro-tape” or a thick double sided sticky tape. Also make sure to balance you props and motors to remove as much vibrations as possible.
Some general multirotor tips:
Do not use bigger propellers than you need. Light propellers gives faster response resulting in a more stable platform.
When designing your platform try to get it to hover around mid-stick. This means that your platform will have enough power at all time to respond and compensate but not have to much power resulting in a less stable platform. To achieve this use bigger/smaller propellers, lower/higher kV motors, more/fewer number of battery cells or more or less weight.
Safety:
Never have the propellers mounted when setting up your platform! A spinning motor without a prop isn’t dangerous but a prop spinning at wide open throttle cut’s flesh better than a hot sword. Therefore, never ever have the props attached when you’re setting up or making adjustments to you multi-rotor platform.
Hooking up your KK-board:
Receiver:
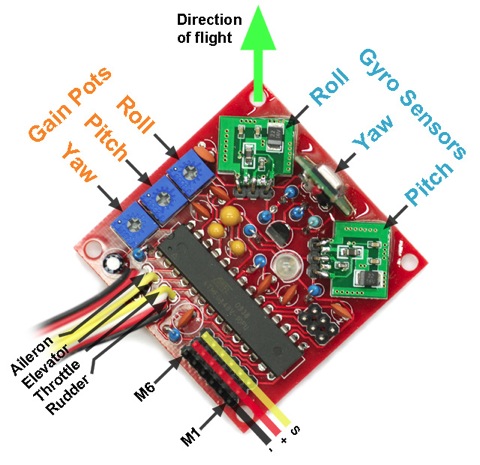
The soldered cables coming of the board are the four signal wires that plugs into your receiver.
On a Futaba/Hitec receiver they plug in as follows:
Aileron – Channel 1
Elevator – Channel 2
Throttle – Channel 3
Rudder – Channel 4
On a Spectrum receiver simply plug the aileron into the aileron port, elevator to elevator and so on.
Motors/ESC’s:
Down in the corner there are 6 motor outputs (M1 through M6)
On a Quadcopter-X the ESC’s are plugged in as such:
M1 – Front left motor CW
M2 – Front right motor CCW
M3 – Back right motor CW
M4 – Back left motor CCW

Preparing the transmitter:
Create a new model memory and make sure that all mixes are disabled, all trims are neutral and that all End Point Adjustments (EPA) and D/R’s are set to 100%
If you have a computer-radio you can chose either airplane or helicopter mode. It doesn’t really matter. The helicopter mode will have the advantage of setting a custom throttle curve for those who doesn’t like a linear response on the throttle. If you use the helicopter mode make sure that the swash is set to; two servos 90°. If you use 120° CCPM mixing your platform will be unflyable!
Arming and disarmed the flight-controller:
The flight-controller has a built in safety feature which disables the throttle stick. This is a great feature that probably will save your platform or face at least once.
The KK-board will on power up be in the “locked”/disarmed position. The LED on the board indicates if the board is armed or not.
LED off = “locked”/disarmed, LED on = Armed.
To arm the board move the throttle/rudder stick down to the right corner and hold it there for about 5 seconds. The LED will turn on indicating that the board is armed and ready. To unarm/lock the board again move the throttle/rudder stick down in the left corner for 5 seconds.
Step by step setup guide:
1. Check if the throttle stick
This is to ensure that the throttle stick is moving the right direction and have enough trow to initialize the flight-controller.
Never perform this step with the props mounted!
– Turn on the transmitter and then the flight-controller
– Move the throttle/rudder stick to the down-right corner
– The LED should turn on, if it doesn’t:
– Try adding a bit of “down” trim on the throttle channel
– Try increasing the EPA on the throttle channel
– Try reversing the throttle channel
2. Calibrating the throttle range on the ESC’s
This is to ensure that all the ESC’s have the same throttle range end points. This step only needs to be performed once. Fail to do this calibration can result in an uncontrollable platform. If you ever install new ESC’s this step needs to be performed again.
Never perform this step with the props mounted!
– Make sure that the flight-controller is turned off
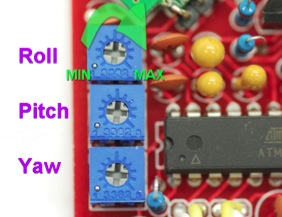
– Turn the Yaw pot to the MIN position
– Turn on the transmitter
– Move the throttle stick to top (full)
– Turn on the flight-controller
– Wait until the ESC’s beeps twice after the initial beeps. (Plush and SS ESC’s)
– Swiftly move the throttle stick fully down (closed). The ESC’s beeps
– Power off the flight-controller
– Restore the yaw pot to around 50%
3. Checking the direction of the transmitter channels
This step is to ensure that the sticks actually perform the action in the way that they are supposed to.
Never perform this step with the props mounted!
– Turn on the transmitter and then the flight-controller
– Arm the controller. (Move the throttle stick to the down-right corner)
– Start the motors by raising the throttle (around 1/4 or so)
– Move the Pitch (Elevator) stick on the transmitter forward. The two back motors (M3,4) should speed up. If it doesn’t, reverse the channel in your transmitter.
– Move the Roll (Aileron) stick to the left. The two right motors (M2,3) should speed. If it doesn’t, reverse the channel in your transmitter.
– Move the Yaw (Rudder) stick to the left. Motor M1 and M3 should speed up. If it doesn’t, reverse the channel in your transmitter. (You ought to have noticed this before as this would also mean that the arming function was reversed)
4. Checking the gyro compensations
This step is to ensure that the gyros compensate in the right direction. If they don’t the platform will be uncontrollable and flip heads over heals.
Never perform this step with the props mounted!
– Turn on the transmitter and then the flight-controller
– Arm the controller. (Move the throttle stick to the down-right corner)
– Start the motors by raising the throttle (around 1/4 or so)
– Tilt the Quadcopter-X forwards. The two front motors (M1,2) should speed up. If it doesn’t, note it, you’ll fix this in the next step.
– Tilt the Quadcopter-X to the right. The two right motors (M2,3) should speed up. If it doesn’t, note it, you’ll fix this in the next step.
– Rotate the Quadcopter-X to the right (clockwise). Motors M1 and M3 should speed up. If it doesn’t, note it, you’ll fix this in the next step.
5. Revering the gyros
This is how you reverse the compensation direction of the gyros
– Make sure that the flight-controller is turned off
– Turn the Roll pot to the MIN position
– Turn on the transmitter then the flight-controller
– The LED will flash rapidly 10 times and then turn of
– Move the stick for the gyro you want to reverse. (If you want to reverse the roll gyro, move the roll (aileron) stick)
– The LED will flash continually to confirm your choice
– Turn of the flight-controller
– If more gyros needs to be reversed, turn on the flight-controller and repeat the process. If you’ve reversed all the gyros you want, restore the pot to 50%
6. Reversing the pot direction
If you think that the pots turn in the wrong direction you can reverse the direction. This will mean that the MIN and MAX in the picture above will be inverted.
– Make sure that the flight-controller is turned off
– Turn the Roll pot to the MIN position
– Turn on the transmitter then the flight-controller
– The LED will flash rapidly 10 times and then turn of
– Move the throttle stick for the to the top
– The LED will flash continually to confirm
– Turn of the flight-controller
– The pots have now been reversed. If you wish to reverse the pots back you need to turn the Roll pot fully to the other extreme and repeat the process. Otherwise restore the pot to 50%
Final adjustments:
– Make sure that all pots are set at 50% (in the middle)
– Make sure that the CG of your platform is correct
– Make sure that all the D/R’s are at 100%
Liftoff procedur:
– Place the platform on a plane surface
– The platform should be motionless before takeoff
– Arm the controller by moving the throttle/rudder stick down in the right corner for 5 seconds or so
– Raise the throttle and fly. The gyros calibrate just as the throttle stick leaves the minimum position
Finding the correct gain:
– Increase the gain in small steps until the platform starts oscillating (overcompensating making the platform rock from side to side)
– Reduce the gain a bit
– You now have the optimum amount of gain.
– Fast forward flight requires lower gain.
– Too low gain is recognized by a hard to control platform that wants to tip over.
– Too high gain is recognized by oscillations.
EPA, D/R and EXPO:
If the platform feels to fast or twitchy you can either reduce the EPA’s (End Point Adjustment) or D/R’s (Dual Rates) or add EXPO (Exponential)
EPA and D/R makes the whole stick less sensitive and makes the platform “slower”. EXPO makes the middle of the stick less sensitive but keeps the throw at the end of the stick. This means that you can have nice control in a hover, which requires small adjustments, but you keep the ability to fly fast and agile.
– It’s not uncommon to need a couple of clicks trim to make the platform hover perfectly leveled. This is due to the small differences in the motors, ESC’s and props.
– Always disarm the platform after you’ve landed. (Move the throttle stick down in the left corner for 5 seconds or so) This little procedure has the potential to save you platform or face, so be sure to make it a habit.
Good luck!
Dear David, thanks for all the info you share here! You (and your videos) motivated me to build my own muticopter. I just finished my first X quad copter (Flitetest’s H quad) and I’m having trouble with the control board or the lack of knowledge how to set it up properly.
I’m using HobbyKings v2.1 board and flasehd it with Kaptein Kuk’s 4.7 firmware. The copter would not fly level and would slowly but increasingly rotate around it’s vertical axis, flying in a helix pattern without any steering imput. The right back motor (lazy motor in the firware?!) would not spin as fast as the other 3 motors. I tried all I coould think of, I even reflashed the ESCs (30A RedBricks) with Simon’s firmware. But I finally gave up on KapteinKuk’s 4.7 firmware and re-flashed the board with XXcontrol KR v2.9 by Minsoo Kim’s software to see if it changes anything. It made a huge difference. The copter is level now but it still rotates around the vertical axis slowly and I can’t trim it on my tx to make it stop rotating. Nor does it really react on yaw/roll/pitch trimmers…. Cand you suggest what should I do to solve my problem?
Thanks!
I had the same problem with my kk.
So I’m to using the older version and now it works, except that I can’t reverse gyros. :-\
Sir I am From India.I am the student.I bought Quadcopter Combo Pack. The HK Multirotor conrtol board X config,FS CT-6B transmitter,1800kv motors,20A Esc’s.11v Lipo battery.
The Problem is Throttle stick is working fine and the Right Hand side stick is not responding Back motors Not speeding Up.I checked Transmitter connected to Pc Right stick is Working and there is Response on HK 3.0 when moving the Quad Left down and Right down there is no Speed variation on Motor’s Please Help me sir.
What kind of flight controller is this?
One of my motors doesn’t work.
1