
Since the weather has turned fowl here in Sweden and it’s getting dark well before I get home, I decided it was time to dust of the old hotwire cutter.
This time I will be making a 120cm wingspan Zagi10 flying wing. I started off by measuring one of my old AitT wings and simply scaled everything up by 50%.

Here is the Zagi10 template that I made. It’s made out of 1.5mm plywood. For a comparison the template underneath it is the one used for the old smaller AitT wing.

Step one, steal underpants… Oh I mean cut out the blocks. I made a template for this out of cardboard, to be able to do this accurate and fast.

Easy as pie. The foam board i use is 60*120*7 cm, so this time I’ll be using the whole width.

Out of two sheets I got 6 blocks, which is enough for 3 flying wings.

I use needles to secure the template to the foam.

It turned out pretty nice.

One wing done! Now it’s time to start building.

This wing definitely needs to be reinforced, otherwise it will be flapping all over the place.

Plucking some foam

I used a soldering iron to make it smooth

This build is going as cheap as I can make it, so I use pine wood as reinforcement. A 10*10mm piece that I glue with wood glue.

Smooth…

Both wing halves done. I also sanded down the ends of the wood to make them flush in ends.

Time to glue the two wing halves together. For this I use 6 minute epoxy.

Done! Now I need to figure out the motor mount and so on…

When I was trying to come up with a good design for a motor mount, I came up with an idea. Since this is a 3 channel airplane, why not make it a 4 channel? After all the rudderstick just sits there, unused. So why not make a rudder? No, that’s no fun… Thrust vectoring? Yeessss…. Muhahaha

I made the thrust vectoring motor mount out of 1mm DIY PCB board. Simple to work with and I could simply solder it together.

I drilled out two, not to deep, 8mm holes with a 4mm hole connecting these holes, in this 12*12mm pinewood piece and added two 8*3*3mm bearings.

This is how it turned out. Super smooth motion without a trace of slope. Just the way I like it.

Easy to make and very light weight, I think it turned out pretty well.

Motor mount glued in place using epoxy.


Cut away some foam to make room for the thrust vectoring movements.

Servo and pushrod for the thrust vectoring.

A hole for the battery.

1mm plywood for the bottom of the battery bay.

I used a couple of left over “snakes” (pushrods) from an old multiplex build. The elevons are made from 4mm balsa.

This way I could mount the servos up front.

I used clear packing tape to cover the wing and add strength. I also imbedded a 6ch Assan receiver.

Close up of the wiring.

I then covered it with some monocote. The black stripes turned out pretty good if I may say so my self.


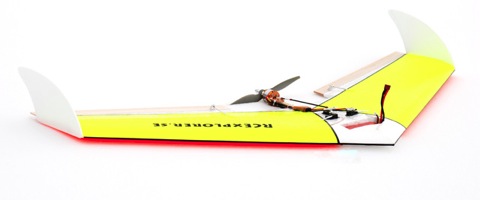
Done! Winglets in place and ready to go.


Time to maiden!
It did fly but the thrust vectoring didn’t really do much. It was pretty cool to do rainbows and knife edges and such but I wished it had a little more authority. Oh well better luck next time.
Leave a Reply
You must be logged in to post a comment.