I’ve been working on this for quite a while. I hope you guys enjoy it!
New video! – The Duck from HELL!
2 Comments
The Duck from Hell build log
For those who are interested in how things are made, I’ve just finished up a over 100 picture build log on the Duck from Hell. Please don’t try this at home though as you could very easily burn your house down.
(Go to a friends house) No but seriously don’t do it. For educational purposes only 🙂


The Duck from Hell
WARNING! Do not attempt to build fire breathing birds at home.
I know this isn’t technically a duck, but don’t be racist ok.
I couldn’t find a duck decoy around where I live so a goose had to do. Also the goose has much more room to fit fun stuff like a flamethrower and a stungun.
In case you missed the video, here it is:
Ok now that’s out of the way, lets get started.

The goose decoy came with a few different swappable heads. These were the two most suited for the purpose I had in mind.

To get the soon to be Duck from Hell through the water, a propulsion and steering solution was needed. The most obvious and simple way of doing this was to buy a cheap RC boat.

This 460mm boat was only 30 bucks on Hobbyking. Size wise it’s pretty well suited. Could have been a bit bigger. But it will do.

Under the hood there’s a water cooled Speed 400 brushed motor.

The boat is designed to run on a 2S lipo and stock it pushes it around at 30km/h or so. Probably won’t achieve that kinds of speeds once integrated into the body of the goose though.

I want to be able to reuse this boat later so I didn’t want to break apart the water proof receiver and ESC box. Plus I need 8 channels in total to control all functions I want the Duck from Hell to be able to have. So I decided solder on some separate power cables to the motor and run a separate external brushed ESC.

I had a ton of these 20A brushed ESC laying around. They are awesome to use for DIY RC projects that need simple DC voltage regulation, like controlling LED’s and stuff.

To give some water protection to the ESC I used some self vulcanizing tape. If you’ve never used this kind of tape, you’ve definitely missed something! It is awesome.
The Duck from Hell is going to be rather heavy compared to what the boat is designed to be able to float. I’m going to use some XPS foam to provide that buoyancy. Whatever floats your goose.
I didn’t feel like pulling out my hotwire cutter so I used a box knife to cut the foam into shape.

Done. Fit’s reasonably well.
Time to cut a slot for the boat.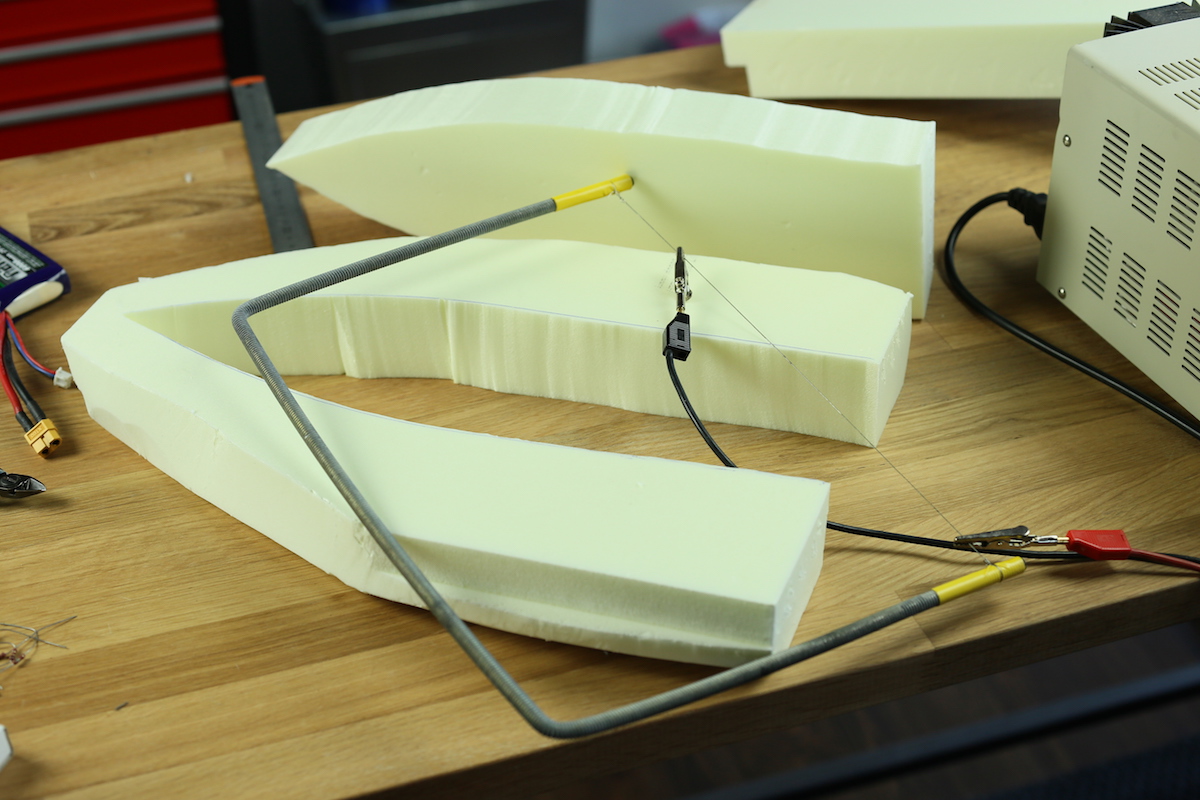
I caved in and went looking for my hotwire cutter. It’s a lot more precise when cutting and doesn’t stress the weak areas of the foam.
Like a gloooove.

To attach the boat to the foam I used liberal amounts of hot glue. I made sure it made a water proof seal around the whole edge.
Look at that beauty.

Naturally the head of the Duck from Hell needs to be turnable. Being rather heavy I decided to use some bearings to support it. That way I can get really smooth motion and not stress the servo.

I’ve had these needle bearings in my bearings box for ages. I accidentally added them to my cart while ordering some other bearings. I figured I would be able to use them at some point in the future and with pure luck they fit perfectly in the neck hole of the body!

Removed some material on the neck stump to make the head fit properly. We’ll get back to this part later.

Another necessary feature is for the Duck from Hell to be able to open and close it’s mount. So I cut the lower part of the beak open with a dremel.

Now looking like Phteven, the lower part of the beak needed a pivot point. The simplest way I could think of to make this pivot and still be able to remove the bottom part was to use a tube and some steel wire.

Drilled a small hole on each side of the top beak.
Glued the tube in place on the bottom piece.

Shoving the steel wire through the side of the beak and through the tube and then trough the other drilled hole completes the pivot.
Low friction and pretty forgiving when opening the beak to far.

To open and close the beak remotely I added a control horn from an old airplane. 
A 9 gram servo was glued inside of the head.

It was then connected to the control horn via a steel wire. It was easy to trim the range as the steel wire could be bent while in place to make it shorter or longer.

Then it was time to take a trip out to the laser house.

I needed a simple dispenser for the butane flask used for the flamethrower. This was the design.

Had some 4mm plexi laying around, so I used that.

Piew piew! Missing the sharks though.

All cut.

Assembled using some plastic screws and nuts.
Really really simple design. All I needed was a way to hold the flask, a piece to push the flask opening against and a servo with a leaver to push the flask forward.
All assembled.
Worked really well. Easy to swap flask if one would run out.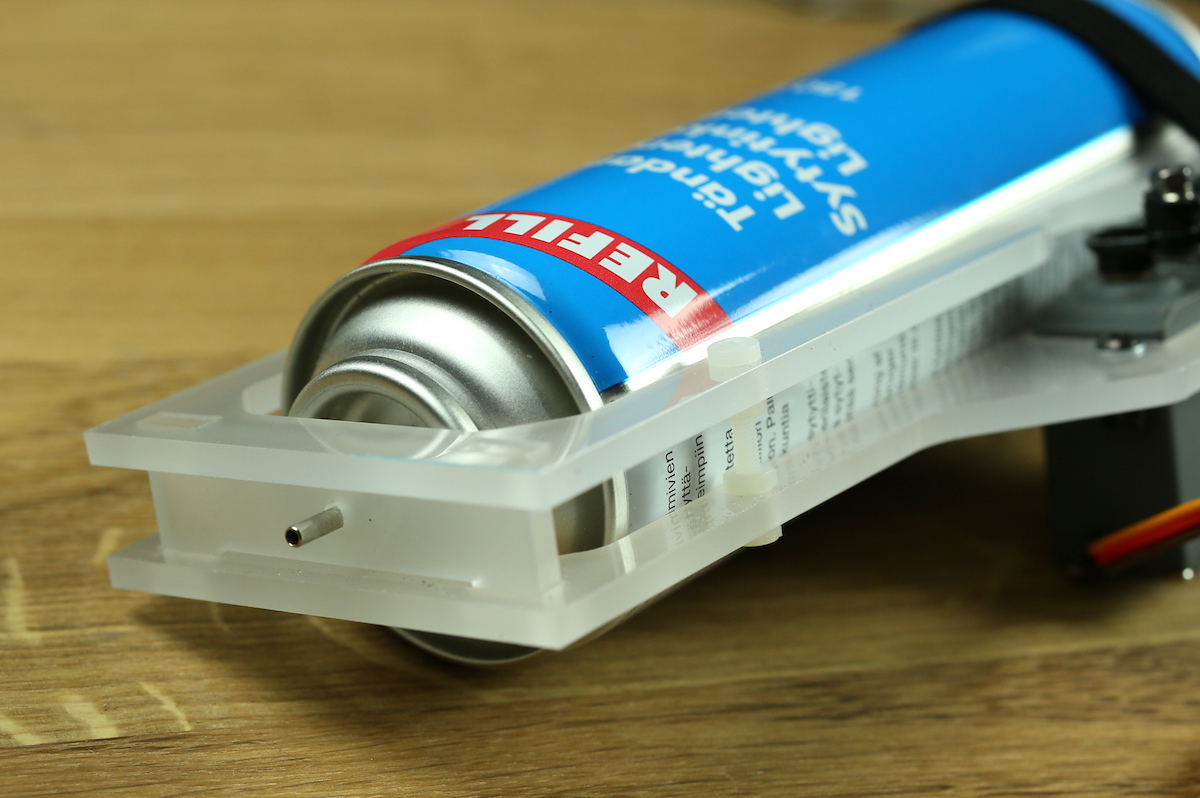


3D model compared to the real design. (123D design used)

To dispense the butane out the beak I used a piece of brass tubing.

Soldered together the pieces that will fit in the roof of the beak.

Bent into the proper shape.
Glued in place in the beak. A pretty good downwards angle is a good idea to get the flame away from the plastic pieces.

To protect the top piece of the beak a bit more I added some aluminium tape.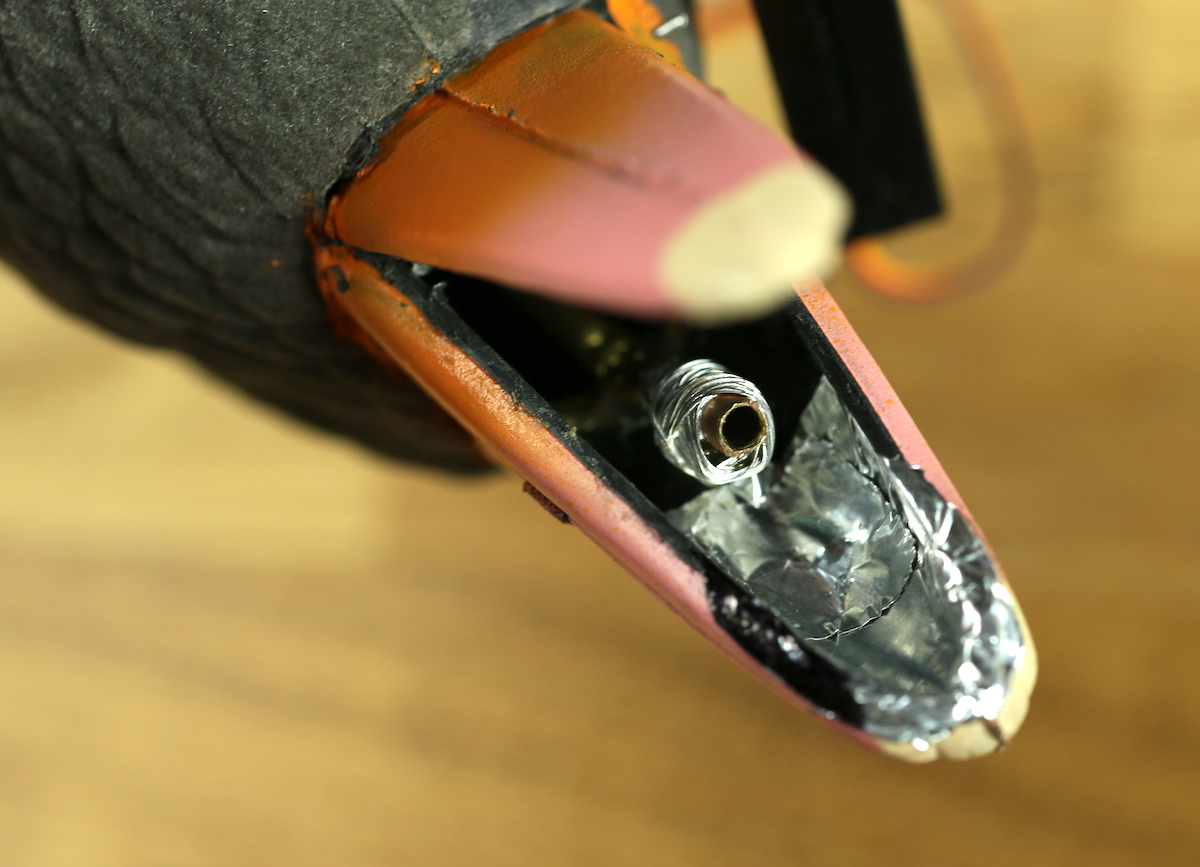

Painted it black using a magic marker so that it would blend in a bit better.

Next I made a super simple ignition system for the butane. A long wire with a servo connector at the end was used.
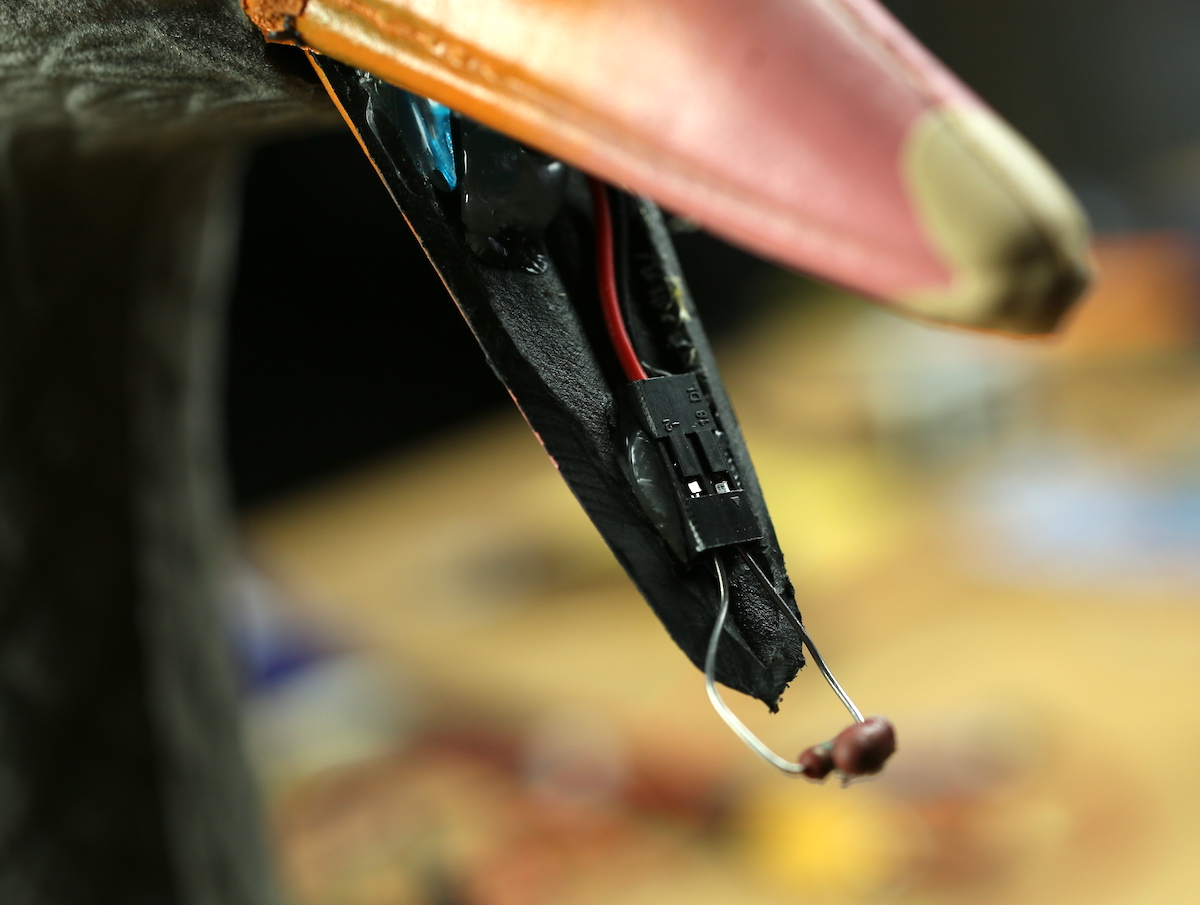
It was then glued to the bottom piece of the beak.

The other end was connected to another 20A brushed ESC.

A low ohm resistor can very easily be inserted into the servo connector.
When the ESC gives full power out the resistor draws around 1-2 Amps. The resistor heats to the point where it actually catches on fire.
The resistor can’t be too low of a value and not too high either. You need to calculate the resistance you need for your specific voltage.

Test run! Worked great. The resistor ignition is very reliable, but it’s one time use only. You must replace the resistor after each use.

Next it was time to do something about those eyes.

Made a hole large enough to get an LED through in the existing eye socket using an exact-o blade.
Some wiring added. 
Soldered up the LED’s and resistors.
Added heatshink.

To get the eyes looking somewhat good and also hold the LED’s in place I used hotglue. I added a bead to the LED and pushed in. Then I pushed on the glue with my thumb to get a slightly frosted finish.

Eyes turned on. I used yet another brushed ESC to control the LED’s.

Looks pretty menacing right?

Originally I was planning on using a small stungun to ignite the butane, but it turned out it wasn’t a reliable ignition source. The gas needed to be the exact right mixture and if there were any wind it just wouldn’t work. This is a simple voltage regulator for the stungun.
 It’s still a pretty cool thing so I decided to throw it in there just for the heck of it.

Yet another (but smaller) brushed ESC was used to turn the stungun on and off.

The stungun prongs before being glued in place.

Stunning!

The stungun is easily powerful enough to bring down a horse. A small horse… An old Falabella with a heart problem maybe. Anyways it does look and sound pretty cool.
All wires and tubes going into the head. Ready to be mounted on the body.
The bottom of the head is also supported by the same needle bearing as the one on the top. It’s hotglued in plase on the bottom.
 Two slots were cut into the base of the neck and a servo horn added.

To mount the servo I used some 2mm plywood.

Dremeled in to shape.
Servo added.
Held in place with yet more hotglue.

To get the wire out of the boat I cut a hole way up front of the cover.

Fished the wires through and added some tape to make it water resistant.

To offset the weight of the head and get a somewhat balanced CG I added a 2S 6000mAh battery to the back
Strapped in.
That still wasn’t enough so I added a extra floating device (more foam) to the front.
Butane dispenser glued to the top of the boat.


Cleaned up the wire mess as best as I could. The Duck from Hell uses 8 channels total:
1. Steering servo
2. Throttle
3. Head turn
4. Open beak
5. Turn on eyes
6. Stun gun
7. Gas flow
8. Ignite gas

Ready for some action.

The top speed of the Duck from hell isn’t that good. Around 3km/h or so. First I had the boat not angled down enough so there was a lot of spray produced. (You can see this in the video) But I managed to take care of that later. Still it’s a lot of stuff to push trough the water.


Now for the fun stuff, Fire! The ignition works beautifully even in windy conditions.

Running the flamethrower for longer periods of time heats up the plastic a bit. During my test I could have it on quite a while. Out on the lake where there were winds the flames were pushed in directions I didn’t take into account.

After a while the bottom of the beak caught fire.

That is what you see in the video when fire is dripping from the “mouth” of the beast. Looked cool but the poor thing lost the whole bottom of the beak. We had to amputate the remains…
We did manage to set another goose on fire though and it burned pretty well.

Here Johanna is trying to put out the flames with some ice cold water.
Thank you Johanna for helping out with the filming. It was miserable and cold during the shoot but the end results were worth it.
Tricopter V3.5 Build log

After searching and searching after the perfect tricopter V3 motor I ended up getting custom ones made. The results on the test bench were spot on! So I decided to build Tricopter V3.5 from scratch with the new electronics and while I’m at it, why not make a build log as well.

Tricopter V3.5 build

After searching and searching after the perfect tricopter V3 motor I ended up getting custom ones made. The results on the test bench were spot on! So I decided to build Tricopter V3.5 from scratch with the new electronics and while I’m at it, why not make a build log as well.
New FT AfterHours podcast

I’m on the FT after-hours podcast again. In this massive 2 and half hour long podcast we cover tech questions, rant about the FAA and Swedish regulations and talk about our best full-scale experiences.
Listen to it through Itunes or download the MP3
Air Bears – You can make a difference
Air bears is an absolutely awesome organisation dedicated to connecting RC pilots and local authorities to help in Search and Rescue missions of missing people.
It’s a volunteer based system. If you have a multirotor or fixed wing platform that you can keep on standby to help the local police or fire department in your area, you simply sign up on their website (there is a onetime fee of $25 to cover the registration process and you get a T-Shirt). You’re now registered on their global network of pilots. An online map will help the local authorities that need help, find the closes pilot and quickly get in contact. You can also help spread the word to your local authorities by giving them this brochure.
The goal of Air Bears is to have global coverage of standby ready volunteers to help reunite missing people with their families. If you don’t have an aerial platform that you can have on standby you can help out by donating to the cause.