
My friend Christian reasonably bought a new transmitter as well. He also was deciding between the Aurora 9 and the Futaba 8FG, but unlike me, he chose the 8FG. This gave me and opportunity to really feel the differences “in real life”

From the left: Futaba 8FG, Hitec Aurora 9, Futaba 7C (more…)
Author: RCExplorer – David
-
Aurora 9 and 8FG side by side
-
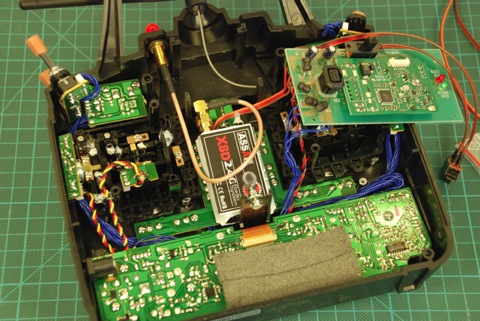
Assan X8D Hack module – Futaba 7C
Assan X8D Hack module

This is the Hack module as it comes in the box.
The radio I’m going to put it into is a Futaba 7C. Here is mine with the back of.
I drilled a hole for the RP-SMA connector (Antenna connector).
Screwed in place.
Next we need to find the VCC, GROUND and PPM signal. Here is the FASST module removed.
Pretty straight forward in my case. I will be using a switch to switch between the FASST and the Assan modules. Note the crazy colors on the cables!
Here is a simple wire diagram of how the switch is hooked up.
Soldering the switch.
Soldering the wires.
I placed my Assan module underneath the FASST module.
There will be no need to see the Assan LED as it also uses a very loud speaker as an indicator.
I placed my switch in the place where the crystal usually sits.
No worries about accidentally bumping the switch during flight.
Done! You can now use cheap receivers. -

DIY printed circuit boards
Before you start you will need these things:
- Protective gloves
- Safety glasses
- Preferably a gas-mask.
- A CAD program
- A printer
- OH-paper (Transparent paper)
- A UV-light
- Pre-sensitized copper board (positive photoresist)
- Caustic Soda
- hydrochloric acid (~30%)
- hydrogen peroxide (~17%)
First of you’ll need to make the layout you will be transferring to your copper board in a CAD program. I use CadSoft’s Eagle software, which I find easy to use.

A screenshot of a high current A123 balancer in progressWhen you are done with the layout it’s time to save it as a black and white image. The white areas is where the copper will be etched away.
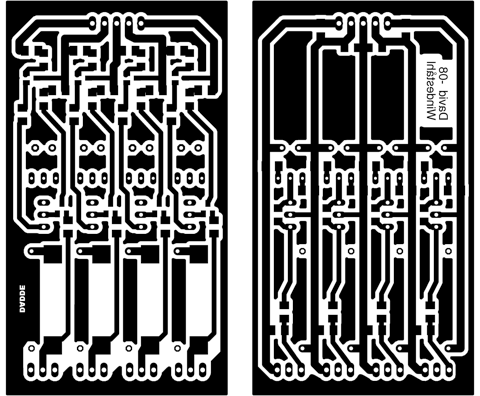
Here is the same high current balancer layout ready for the printer.Now it’s time to print your layout. But don’t print it on the OH-paper to begin with! Start of printing it on plain paper so see the results. You want as a dense black that is simply possible. This is important! The copies cant be better than the original that they came from. The UV-light must not be able to reach the areas of the copper that you want to have left. Also check so that all the components fit where they should fit, so that nothing have gone wrong in the printing process nor in the design process. Now you can print you layout on an OH-paper.

Here is a LED dimmer circuit printed on a OH-paperNext step is to expose the copper board and to do that you need a UV-light source. I built myself a “UV exposure box” that uses two 8W fluorescent UV lamps with 50 mm spacing between them and 55 mm to the glass.

Take care when dealing with UV-light so that you don’t harm your eyes. Keep the lid of the box closed at all times when the lights are on.
The exposure times varies greatly depending on your setup. My setup requires 1 minute 50 seconds to achieve that perfect result.A tip when trying to determine the right exposure time for your setup is to make test PCB. Simply cover all but one piece of the PCB with a thick paper and expose it for 1 minute and then move the paper a bit and expose it for 1 minute again, and so on. The final strip will then be exposed for 1 minute and you will have a board with 1 minute resolution witch makes it easy to get into the right ballpark at least.

When you are done with the exposure its time to develop the PCB. Now it’s time to put on the protective gloves and mix some caustic soda with water. You need 3 dl cold water and 1 teaspoon of caustic soda. Make sure that you mix it properly! The caustic soda should be completely de solved in the water.

Now place the developed PCB into the solution. There will be a fast reaction and the water will darken with the exposed photoresist. Its important that you keep a good flow on the solution around the PCB during this process either by stirring or tilting the container back and forth. As soon as it seems nothing is happening its time to get the PCB out of the solution and wash it of in cold water. This process usually takes 10-20 seconds.

(The PCB in the picture has already been washed)
Always ware gloves when using chemicals!You will now be able to see a faint outline of the layout on the copper.
Now comes the nasty stuff!

Its time to mix the hydrochloric acid, hydrogen peroxide with water. One extremely important thing when doing this is AAA! Always Add Acid to water!NEVER EVER the other way around!
A good mix of the chemicals is 2:1:1 (2 parts water, 1 part hydrogen peroxide and 1 part hydrochloric acid). I usually mix so that I get 2 dl of solution. That means 1 dl water and 0,5 dl hydrochloric acid and 0,5 dl hydrogen peroxide. Start with the water and then add the acids! When mixing the chemicals toxic gas will be released! Be sure to be in a well ventilated area and keep your face away. If you have a gas-mask and safety glasses I strongly recommend using them during both the mixing and the etching.Now that you have a solution that is capable of dissolving copper its time to put in the developed PCB.
Again it’s important to keep a constant flow of the solution. If you are making a double sided PCB make sure to turn it over often. After a while you will see the copper starting to disappear and the solution will turn green-blueish. Take the PCB out of the solution as soon as all the unwanted copper is dissolved and wash it in cold water.

You now have a printed circuit board!

Drill your holes and sand the copper using steal wool to get rid of the photoresist.

The finished balancer.Good luck with your projects!
-
I’ve got new fancy transmitter
I finally took the plunge and replaced my old Futaba 7C transmitter with a brand new, fancy one. After much contemplation on which one to choose, I settled on this one:

The Hitec Aurora 9. And I must say that I’m very satisfied with my choice. I love the touch screen and the powerful yet simple to use interface. (more…) -
The F3K build soon finished
Time for an update on my DLG build. I’m nearly done. I’m aching to try it out!

Take me to the build page. -
F3K here I come!
Finally I got my hands on a DLG (Discus Launch Glider) kit! It’s called the A2 and is made by two friends of mine here in Sweden. Oooo I’m so exited!

Enough talk let’s start building! -
New FPV video – Torque rolling 45% Yak54 above the water
It is finally completed. I went trough roughly 900 songs before finding the one that would be my baseline. It then took just over 20 hours to cut, trim and match the video to the music. But it’s finally done! And here is the result:
The airplane is a 3.1 meter (45%) Model Power Yak54 equipped with a 170CC DA170 engine. It was a monster! Weighing close to 18kg the turbulance from the propeller was much more that I though. -
I’m mentioned on ATTF again
The good guys at All things that fly talk about my Welcome to Domaine du Planet video at 13 minutes in to episode #146. You can download and listen to the episode here; ATTF #146.mp3
A big thanks to Diggs and Jamie for doing the shows. I always look forward to tuesdays, because that’s ATTF day.

-
Torque rolling 45% Yak54 above the water
- Airframe: Tricopter V2
- Stabilization unit: KK
- RC TX: Futaba 7C FASST 2.4GHZ
- RC RX: R606FS
- Camera: Gopro Hero HD set at 720p 60FPS
- Video TX: 1.3GHz 300mW, 1/4 Lambda antenna
- Video RX: 1.3GHz with modified SAW filter
- Video RX antenna: Stock whip
-
Welcome to Domaine du Planet – New FPV video
I’m proud to present my latest video – Welcome to Domaine du Planet
I captured over 200 minutes of FPV video during my stay at the RC hotel Domaine du Planet in France, and this video is the result. I hope the video properly communicates the beauty, calm and magic of the hotel and grounds. Enjoy!