Author: RCExplorer – David

  • Twinstar II FPV

    Twinstar II FPV

    A friend of from www.fullkontroll.se asked me to build a complete FPV setup for him. I got to choose what gear and he would get for me. That sounded good to my ears, so I agreed. Here is the shopping list:

    The airplane
    Airframe: Multiplex Twin Star II
    Motors: 2 Above All 2813-18 1022kV
    ESC’s: 2 Above All 18A v2 ESC’s
    Battery: 3S 3600mAh 10-15C Electric Power LiPo
    Servos: 4 Power HD-1160A Servos
    Props: 2 8*6 APC props
    All from www.fullkontroll.se

    The FPV setup
    Goggles: Rvision-D
    VideoTX: 300mW 1.3GHz
    VideoRX: Dual output 1.3GHz
    Antenna: 8dBi Patch
    Lens: f2.97 “wide”
    From Rangevideo.com

    Camera: 420 TVL 1/3” SONY CCD CCTV Camera
    From ClasOhlson.se

    OSD: Flytron Simple OSD Ultralight edition + current sensor
    Headtracker: Flytron Dt-3k hybrid headtracker
    From Flytron.com

    Pan/tilt:
    1 HS65HB servo
    1 HS55 servo
    1 sheet 3mm plywood

    Other:
    6 pairs of Multiplex battery connectors
    4 60cm servo extension cables
    4 30cm servo extension cables
    1 bottle medium thick CA
    1 bottle accelerator for CA

    Everything arrived just fine and I started the build with the FPV pod;

    3mm plywood


    To elevate the camera a bit and have something to hide the filter and OSD in, I built a little box on top of the pod.


    I modified this HS65HB which i’m going to use for panning, with a 2.1K and a 1.2K resistor to get 180° of travel. Here is a guide that describes how I did it


    This is the 420 TVL 1/3” SONY CCD CCTV Camera from ClasOhlson.se. Stock it’s quite heavy, weighing in at 52 grams, but I’m not going to leave it that porky!


    Removed some metal…


    I also removed the connector and soldered wires directly to the PCB which I then glued with epoxy.


    That’s better! it now weighs 22 grams with a f2.97 wide lens.


    The pod is coming along nicely.


    A HS55 servo for the tilt.


    I modified a R617FS receiver with a “lost package indicator” output


    This output is hooked up to the RSSI input on the OSD and displays the true RC link health.
    Here is a guide for more info and how to do it


    The Simple OSD modified with a “lost package indicator” filter
    Here is a review of the Simple OSD ultralight


    The 300mW 1.3GHz transmitter that I will modify with a DIY antenna and remove the connector.


    I removed the SMA connector and will directly solder the new 1/4-wave lambda antenna to the output.


    The input connector removed and the cables have been soldered directly to the PCB, as well as the new antenna.
    Here is a guide to making your own antenna and tuning it


    I added epoxy to make sure that no solder joint get stressed.


    The transmitter done with the input cables braided to reduce interference.


    Since the FPV setup is going to be powered by the same LiPo as the RC setup, I needed to make a filter. It’s a very simple filter using nothing more than a couple of capacitors and a coil.


    This is the schematic for the filter. In my case I used a 1mH for the coil, 220uF for C1 and C2, 100nF for C3 and C6 and 10uF for C4 ad C5. The capacitors C3-C6 are 1206 SMD size and are soldered directly C1 and C2 as you can see in the pictures.


    Here is a comparison shot between the AnyVolt micro and the old DIY filter I made a while back.


    Soldered everything up.


    Added some hotglue.


    Shrink wrapped.


    And squeezed everything into the box on top.


    It turned out pretty darn nice, in my opinion.


    Time to start building the airframe. Since I’ve already made a build log on a Twin Star II, I decided to only take pictures of “interesting” parts of this build.


    I placed the servos in the back instead of in the front to get them out of the way and get the CG a bit further back.


    I used heat-shrink to around the servos and then glued them in place.


    I also extended the battery compartment a tiny bit.


    The fuselage glued together.


    I made a pair of custom motor mounts out of 1.2mm thick DIY PCB lamination.


    I extended the aileron servos with 60cm servo cables.
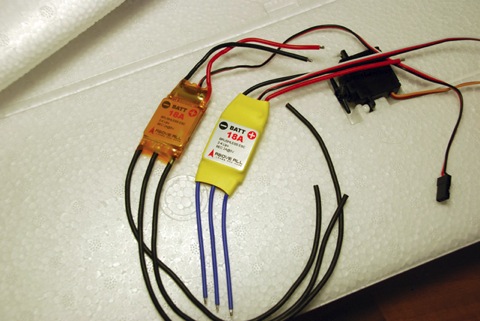

    I extended the motor output cables on the ESC’s and re-shrink wrapped them.


    Instead of placing the ESC’s in the motor pods, I decided to place them nearer the inside of the wing.


    Before glueing.


    After glueing.


    A close up of the current sensor and ESC in place.


    All cables and connectors in place on the wing.


    Started work on the ground station. The patch-antenna will be placed on the the lid of the case.


    The receiver in place together with the cables.


    I used a deans ultra connector between the wings to power the second ESC and multiplex connectors for the signal wires. If you look closely you can also see that I added a piece of foam as a stop for the battery. This way you get the right CG fast and easy every time.


    Hurray, it’s done!


    It turned out pretty darn good in my opinion.


    FPV pod up close.


    Magnet latch on the FPV pod.


    I added some clear packing tape over the ESC’s and current sensor.


    Pretty clean setup, if I might say so myself.


    Each motor draws 14.5A @ 11.7V giving 700 grams of thrust and a pitch speed of 75km/h


    The ground station finished up.


    The piece of wood and rubber band is used for aiming the patch antenna up or down. Works like a charm.

    I hope my friend at www.fullkontroll.se is satisfied with my work.
    I tested everything at least 3 times to make absolute sure that everything worked precisely as it should.

    Unfortunately the weather was terrible so I couldn’t get any good video before I had to send the plane away. But this video is made with the FPV pod from this project:

  • FPV build update

    I’ve started building the Twin Star II that’s going to be the airframe for my friends FPV setup. I have chosen some different solutions than when I built my own Twin Star. For instance, I made a custom motor mount for this build:

    Check it out on the project page

  • FPV flight on New Years Eve, filming fireworks!

    Crazy as I undoubtedly am, I decided to take the TwinStarII out in the -15°C, pitch dark, windy night on new years eve. Armed with two heated wheat bags, two chemical heat packs, a blanket and a flashlight, I went out to the middle of a field by my fiends house. I took of at 23:59 and tried with my freezing hands to control the airplane in the wind.

    Unfortunately, I hadn’t had time to try out the FPV setup properly (hadn’t tried it with the motors running) which resulted in some pretty nasty lines as you can see in the video.
    I used the FPV gear that I’m building for friend (Read more about it here)
    I think the video turned out ok, but I would have liked if had been less windy and a bit warmer. I had a hard time flying smooth and get good video. Maybe next year will be better.

  • The FPV build from the ground up have begun

    Finally I got some time over to start building my friends FPV setup. I started off the build with the FPV pod which I think turned out pretty nice.

    Read more on the Project page

  • Lost package indicator guide!

    Want to know precisely how good your RC link during a FPV flight? This is even a better way than displaying RSSI, it’s a “lost package indicator” for any OSD that has an RSSI input. You only need a capacitor, a resistor and some soldering skill to make it happen! In this guide I will show and describe exactly how it’s done and how it works. After this guide I hope no one ever finding them selfs flying unknowingly beyond their RC link’s range.

    Click here to read the guide

  • Fireworks on New Years Eve

    • Airframe: Multiplex TwinStar II
    • RC TX: Futaba 7C FASST 2.4GHz
    • RC RX: R606FS
    • Camera: 1/3” Sony CCD camera
    • Video TX: 1.3GHz 300mW, 1/4 Lambda antenna
    • Video RX: 1.3GHz dual output
    • Video RX antenna: 8dBi linear polarized patch
    • OSD: Flytron SimpleOSD
    • Video capturing unit: Sandisk V-Mate
  • New DIY antenna guide!

    Pehw, I just finished up a guide to making a crash-proof, light weight, small,aerodynamic and efficient antenna for video transmitters.

    It’s called a quarter-wave lambda antenna and I’ve been using it ever since my first FPV FunJet flight.
    I also written a guide explaining how to tune a DIY antenna to get the absolute best performance.
    Click here to read the guide

  • A cold day with celebrations

    Today I got my 200th Youtube subscriber!
    Wohoo! Congratulations David! Yay!
    And to think that it was only three months ago that I got my 100th subscriber. Thank you, all of you that have subscribed and to all of you that visit this site regularly and post comments. It’s guys like you that made me create this homepage and invest my time. Without you this hobby wouldn’t be any where near as fun as it is. So thank you once again!

    Another thing to celebrate is that the Winter Solstice is today. Which means that from today the days will only get lighter and longer again here in Sweden. But to be honest it doesn’t really matter when it’s -18°C (0°F), which is was earlier today, even if it was light enough when I get home I probably would have stayed inside. Lucky I got a lot to build!

  • Mystery package unpacked

    Good guesses everyone! The content of the mystery package was a complete FPV setup. I will be building this FPV setup for a friend from www.fullkontroll.se. In return I get a Starmax A-10 twin ducted fan ARF airplane. I hope to be able to finish this build in the two weeks of vacation we have from work, now around Christmas. A list of what was in the package can be found after the “Read More”

    (more…)

  • The Big Always in the Trunk Wing (BAitT)

    The Big Always in the Trunk Wing (BAitT)

    Since the weather has turned fowl here in Sweden and it’s getting dark well before I get home, I decided it was time to dust of the old hotwire cutter.

    This time I will be making a 120cm wingspan Zagi10 flying wing. I started off by measuring one of my old AitT wings and simply scaled everything up by 50%.


    Here is the Zagi10 template that I made. It’s made out of 1.5mm plywood. For a comparison the template underneath it is the one used for the old smaller AitT wing.


    Step one, steal underpants… Oh I mean cut out the blocks. I made a template for this out of cardboard, to be able to do this accurate and fast.


    Easy as pie. The foam board i use is 60*120*7 cm, so this time I’ll be using the whole width.


    Out of two sheets I got 6 blocks, which is enough for 3 flying wings.


    I use needles to secure the template to the foam.


    It turned out pretty nice.


    One wing done! Now it’s time to start building.


    This wing definitely needs to be reinforced, otherwise it will be flapping all over the place.


    Plucking some foam


    I used a soldering iron to make it smooth


    This build is going as cheap as I can make it, so I use pine wood as reinforcement. A 10*10mm piece that I glue with wood glue.


    Smooth…


    Both wing halves done. I also sanded down the ends of the wood to make them flush in ends.


    Time to glue the two wing halves together. For this I use 6 minute epoxy.


    Done! Now I need to figure out the motor mount and so on…


    When I was trying to come up with a good design for a motor mount, I came up with an idea. Since this is a 3 channel airplane, why not make it a 4 channel? After all the rudderstick just sits there, unused. So why not make a rudder? No, that’s no fun… Thrust vectoring? Yeessss…. Muhahaha


    I made the thrust vectoring motor mount out of 1mm DIY PCB board. Simple to work with and I could simply solder it together.


    I drilled out two, not to deep, 8mm holes with a 4mm hole connecting these holes, in this 12*12mm pinewood piece and added two 8*3*3mm bearings.


    This is how it turned out. Super smooth motion without a trace of slope. Just the way I like it.


    Easy to make and very light weight, I think it turned out pretty well.


    Motor mount glued in place using epoxy.


    Cut away some foam to make room for the thrust vectoring movements.


    Servo and pushrod for the thrust vectoring.


    A hole for the battery.


    1mm plywood for the bottom of the battery bay.


    I used a couple of left over “snakes” (pushrods) from an old multiplex build. The elevons are made from 4mm balsa.


    This way I could mount the servos up front.


    I used clear packing tape to cover the wing and add strength. I also imbedded a 6ch Assan receiver.


    Close up of the wiring.


    I then covered it with some monocote. The black stripes turned out pretty good if I may say so my self.


    Done! Winglets in place and ready to go.

    Time to maiden!

    It did fly but the thrust vectoring didn’t really do much. It was pretty cool to do rainbows and knife edges and such but I wished it had a little more authority. Oh well better luck next time.